
This blog was written by Graduate Engineer, Abhisha Nirmalathas, as part of her graduate rotation with the Developer Relations team at Xero.
This blog is a quick guide to setting up Sign Up with Xero using .Net — all Xero certified applications now require users to be able to use the Sign Up with Xero feature.
This means, users don’t need a separate registration to use an app on the Xero App Store. They simply log in with their Xero credentials, and a new account within the app is provisioned automatically.
Adding Sign Up with Xero into apps has caused some confusion amongst the developer community historically. Today, we’re going to walk you through two brand new sample apps that we’ve developed to help guide you through this process. Both apps make use of the recommended flow for Sign Up with Xero — where the app automatically provisions an account after the standard OAuth 2.0 flow is completed, rather than populating a registration form to create a new account with Xero (which is the modified flow, for more info check this Youtube video out where it mentions Project 2).
If you’re hearing about Sign Up with Xero for the first time, check out our docs which explain how it works and the different flows.
To follow along, make sure you clone the relevant repo from Github or check out our explainer here.
Two approaches

The recommended flow for Sign Up with Xero can be implemented in two ways, and it’s important to understand how these both work to identify which method is most appropriate for you.
When an app is trying to sign up a new user using their Xero account, the Xero identity provider requires details to authenticate and authorise access to the correct organisation with the appropriate permissions (or scopes).
First, the identity server needs to know the app ID to identify which app to connect to. The scopes also are required to determine what actions the application can perform. At a minimum, the OpenID Connect scopes (openid, profile, email) are required — these ensure that details of the user are returned once authenticated. Sometimes it might be preferred to know the user’s Xero tenant and connect to it automatically during the signup process, in which case organisation scope would be requested for more detailed tenant info as well as “Connect to Xero” process will be included.
Finally, the app’s redirect URI should be provided to indicate Xero’s identity provider to redirect to the address once it has successfully finished authenticating the user and authorising the application.
These parameters can be passed to the identity server in two ways:
- Using a standalone HTML button for Sign Up with Xero which passes through the relevant parameters using meta tags
- Configuring your application using an OpenID plugin which will automatically attach the parameters to the identity server when the user attempts to authenticate.
Standalone HTML button
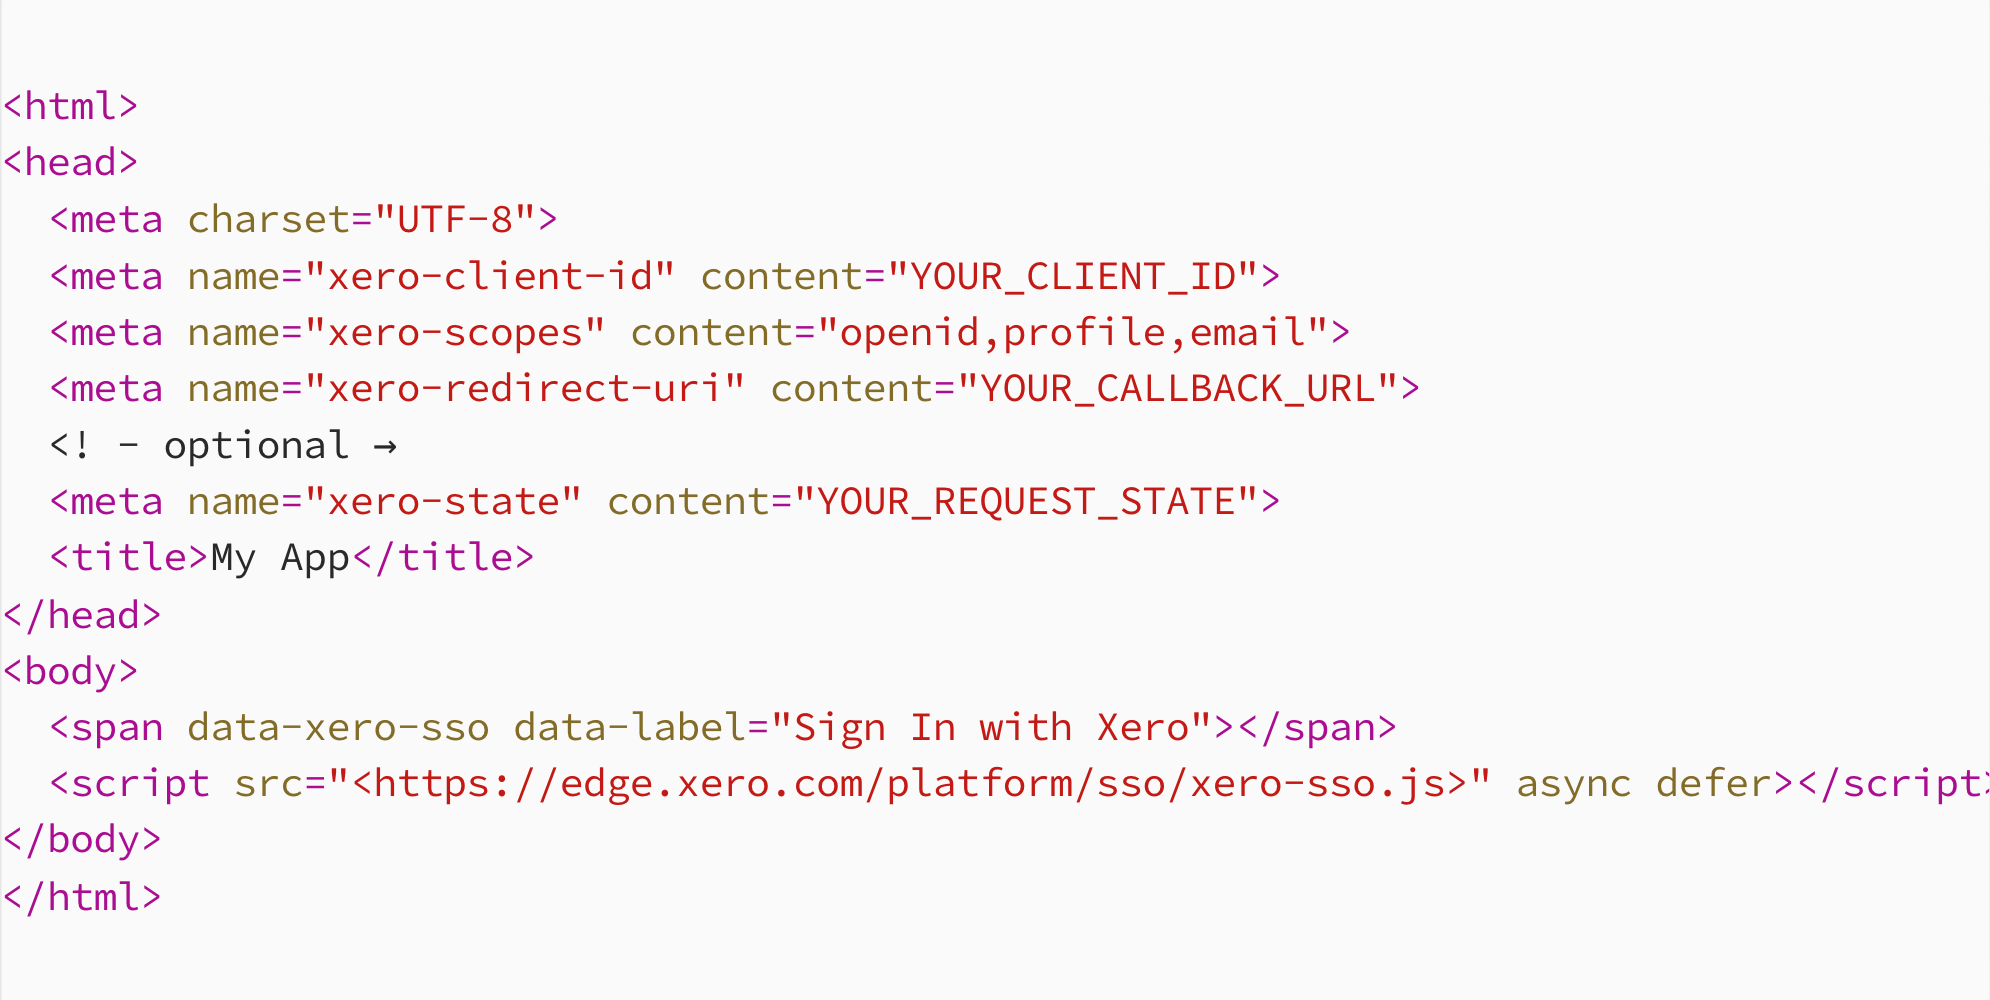
When using a standalone button, the relevant parameters (client id, scope, redirect URI) need to be passed in through meta tags. The script that is passed into the button, searches for the relevant meta tags with the name xero-parameter and uses those values to construct the URL that will authenticate users into the new application. You can read more about this process here.
A limitation of this method is that there is only one redirect URI. This means that if you want a sign in and sign up button, and your application has a separate sign in and sign up URL, this method cannot support this. Instead, if there is a single URL that handles both sign in and sign up actions for your application, you can use this method and simply add another button with the data attribute data-xero-sso. Thus, clicking on either button will perform the same action in the background.
OpenID Plugin
Using an OpenID plugin allows the parameters the Xero identity server expects to be passed when configuring the authentication scheme in the Startup.cs (don’t worry, we will step through this later). As a result, we don’t require meta tags to pass in the parameters. Instead, we can pass in the data-href value to indicate what URL Xero should redirect to after authenticating. This means you can point sign in and sign up to the relevant route within your app.

App 1: Sign Up with Xero using standalone HTML Button
This sample app uses the recommended flow for signing up with Xero, without the use of an OpenID package. Instead, a standalone HTML button is embedded into the Index page, which redirects to the Xero identity provider to authenticate the application. You may recall from earlier that this method requires meta tags to be provided that specify the required parameters. Instead of hardcoding these into the views, we have kept the XeroConfiguration parameters in the appsettings.json file.

Note that the scopes are whitespace-separated to support the .Net SDK which expects the scope to be space separated (only relevant when reconnecting as the build login URL function invoked). The sign up button will convert this to a comma-separated string within the view.
Local database and users
To replicate a real life application, we’ve also set up the project to connect to a database and use that database to register users with the app. There are detailed instructions on how to do this within the project’s README, but the database connection string should also be added to the appsettings.json file.
The database is configured such that it will create a new User table if it does not exist. This is done within the UserContext which declares the User table should be created using the User model. We have chosen a simple implementation for the app’s registration as the primary aim is to show how one would get the relevant information from the access and id tokens to provision an account.
The user model contains information about the user which is extracted from the ID token. This can be expanded as required for your app’s use case.
State container
The state container was created to store information about the current token, ID and state.
Signing up
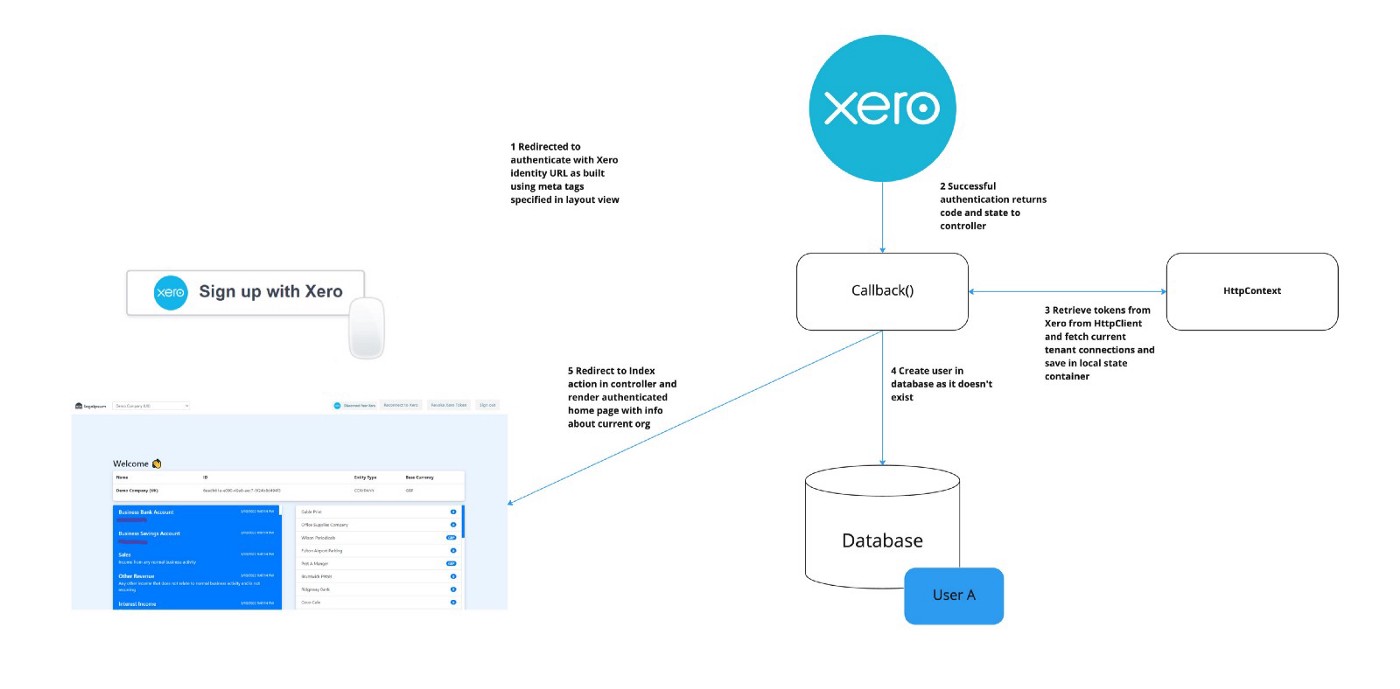
Once the user clicks the sign up button and the Xero identity service successfully authenticates, Xero will redirect the user to the redirect URI provided earlier. As you can see in the appsettings.json, this points to a Callback route which maps to a Callback action in our AuthorizationController.cs.
This function uses the state and authorisation code returned from the Xero identity server, to request the access and ID tokens.

Once we have retrieved the tokens, we store the token within our state container, which simply stores session data. If you remember from earlier, the ID token contains information about the user. Therefore, we extract the information about the user from the ID token to then register a new user into the local database (if a user does not already exist). This would correspond to your application’s unique registration process. Once completed, we sign the user in with cookie authentication (the authentication would differ for your application depending on how your system has been built; we have used cookie auth for the sake of simplicity).

Once the callback is completed, it redirects to the HomeController which makes calls to the Xero .Net SDK to request information about a Xero user. In this example, we request the organisation info, accounts and contacts for the connected organisation. First, the app ensures the user is authenticated, then checks the validity of the access token. As tokens have an expiry date, we must ensure the token is valid to make a successful call to the API. If it has expired, the token should be refreshed or retrieved via reconnection. Afterwards, we need to get the ID of the connected organisation (also referred to as tenant) that we want the information for. This is important as a Xero user can have multiple organisations and they all can be connected to an application. Once we have our current organisation’s ID (from the URL parameter or the first valid organisation we have stored), we can make the relevant calls to the API.
Revoking Xero token and disconnecting from Xero
App developers also need to allow users to disconnect from Xero and revoke their connection too. The sample app does this with two separate routes: Disconnect() and Revoke(). Disconnecting involves removing a single organisation’s connection to an app, whilst revoking removes all the connections from the user’s organisation to the app (done by invalidating the access and refresh tokens).

When either button is clicked, the appropriate call is made to the SDK to either remove/disconnect the currently selected connection or revoke all connections. If the token has been revoked, the database updates the user’s status to be not linked to Xero. This could be useful for developers managing accounts that were created using a generic registration process (sign up with form) and later connected to Xero or vice versa.
Reconnecting to Xero
Users can reconnect to Xero, which allows them to add connections to the app. This works by invoking the Index() action within our Authorization controller. Here we use our SDK’s APIclient to construct the login URL for the Xero identity server and redirect the user to this URL. It is important that we have our appsettings.json’s scopes as space separated as buildLoginURI() expects space separated scopes. Just like the sign up process, once the user finishes adding any new connections, the identity server will redirect back to the callbackURI defined in our appsettings.json.
App 2: Sign In & Sign Up with Xero
The second sample app uses Microsoft’s OpenIdConnect (OIDC) package to allow users to Sign In and Sign Up with Xero. Here, we have built the sample app to have two separate URLs to kick off sign in and sign up respectively. As a result, when building your application via the Developer Central, make sure to configure two redirect URI’s that correspond to the two.
This sample app also requires certain parameters to be set within the appsettings.json. Similarly to the first sample app, we have a XeroConfiguration section which contains the client ID, secret, scopes and state. Notice that we do not specify the callback URI here. This is because in this sample app, we have two separate actions: sign in and sign up. The sample app will have a separate URI for both these processes so we no longer have one universal redirect URI. We will specify this later when configuring our authentication scheme. We also have a connection string section which should input the connection to your database (detailed instructions available in the README).
Adding authentication schemes
If you navigate to the Startup.cs file, you’ll notice there’s a lot of extra code there. Unlike the first sample app which handles auth within a separate authentication controller, this sample app creates and configures an authentication scheme to do this automatically. Auth schemes are ways to specify how authentication works within an app and you can configure multiple schemes. While we specify a basic cookie authentication as our default authentication scheme, we still need to add the OpenID authentication schemes. In the app, we add the Adding authentication schemes.
While we specify a basic cookie authentication as our default authentication scheme, we still need to add the OpenID authentication schemes. In the app, we add XeroSignIn as the default Challenge scheme. As no such authentication scheme exists yet, we then need to define this using addOpenIdConnect(). Here we provide the name of the scheme (XeroSignIn) and then pass in the different values we know the identity server requires to correctly build the login URL. You can see this as we pass in the client ID, secret, scopes, and callback path. Ensure that the callback path used here corresponds to the callback path you declared when specifying your application’s signin redirect URI’s. The same process is then repeated for a new XeroSignUp scheme. It is important we define two separate authentication schemes to correspond to our separate actions.
App’s sign in and sign up routes
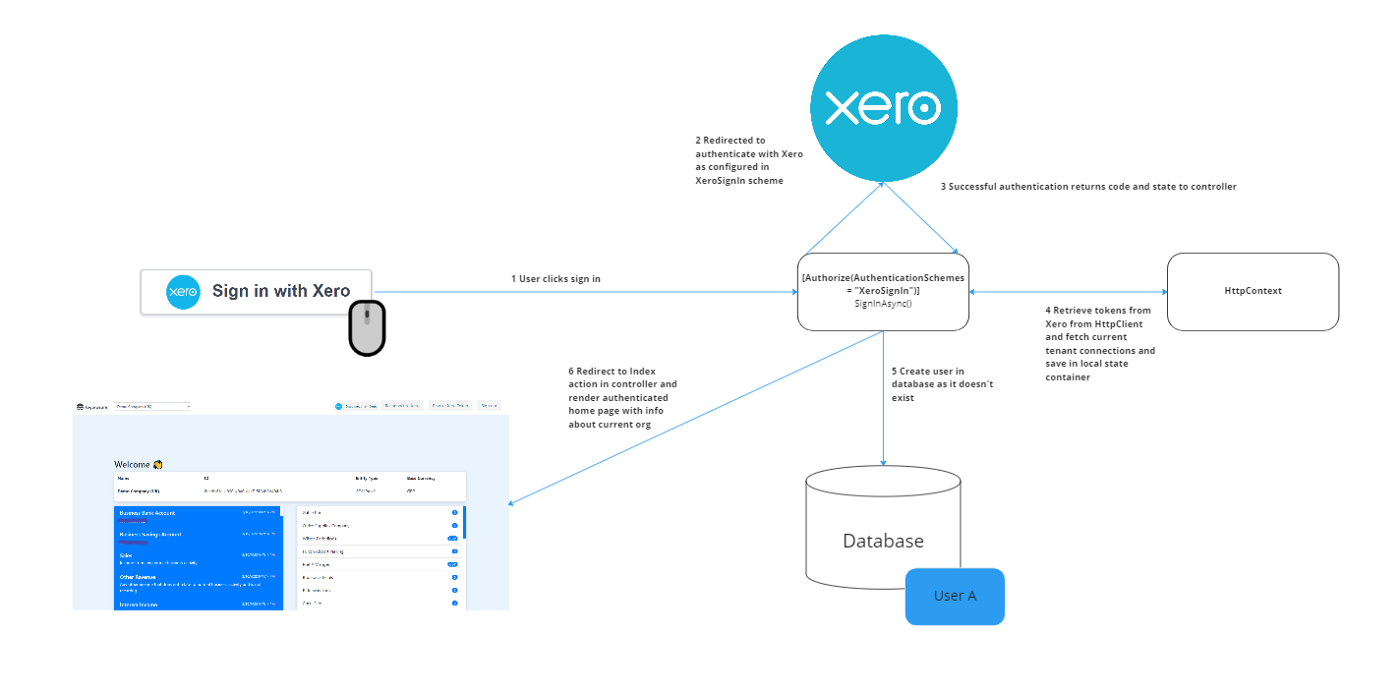
Within our Home Controller, notice that we have the two routes SignUpAsync() and SignInAsync(). Both are annotated with Authorize and specify the respective authorization schemes. This tells the server that when that action is invoked, the user must be authenticated as per the specified scheme.
Our sign in and sign up buttons should have the data-xero-sso attribute to indicate the buttons correspond to the single sign on process, along with the data-href to specify the route for app’s sign in/sign up process.
If an unauthenticated user was navigating to the “/signup-oidc” route, they would be redirected to Xero’s login page. Once they successfully login and allow the organisation to connect to the app, it would then execute SignUpAsync(), resulting in a new user being created in the local database and the relevant token to be saved within the state management system (state container).
Deleting connections and revoking connections
Much like the other sample app, deleting a connection simply calls the delete endpoint within the SDK, and removes the selected tenant’s connection to the app. Revoke, as expected, deletes all connections to the app and the user’s account in the database is set to unlinked.
Reconnecting
Keen observers may have noticed the reconnecting process between the two sample apps vary. In the first sample app, the user is redirected to the Index() action which leverages the SDK’s API client to construct a new login URI and redirect the user to that page. However, this sample app has specific OIDC authentication schemes pre-configured. As a result, to reconnect, the easiest way to do so is to log out the user first and then redirect them to the sign in page. From the user’s perspective, the flow for both apps is exactly the same.
Sign out
When a user signs out, we need to ensure that they are signed out across all the authentication schemes we have configured. As a result, we specify all the authentication schemes and sign out of each one which ensures the user is no longer authenticated. When we are redirected to Index(), the user is no longer authenticated so they see the generic home page with the option to sign in or sign up again. Whilst a user must re-authenticate and obtain a new access token to interact with the app, the user’s current connections (organisations) are not disconnected from the application.

Wrap up
So there you have it. Two different ways to add Sign Up with Xero into your apps. For devs who are looking to create an app, I recommend you try to evaluate which solution is best for you.
For apps which handle both Sign Up with Xero and Sign In with Xero within the same route inside the application, the first sample app which leverages a standalone button may be optimal.
For apps which have a separate Sign In with Xero and Sign Up with Xero route in the application, using an OpenID connect package to register separate authentication schemes is recommended.


%20copy.png)


